
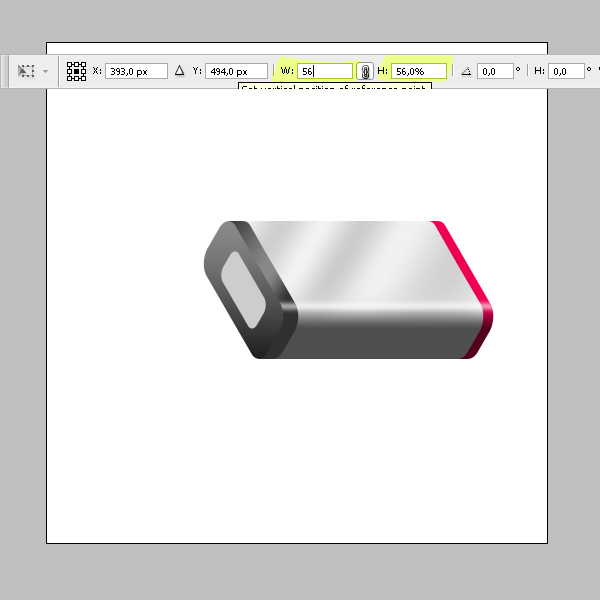
Final Image Preview
Step 1
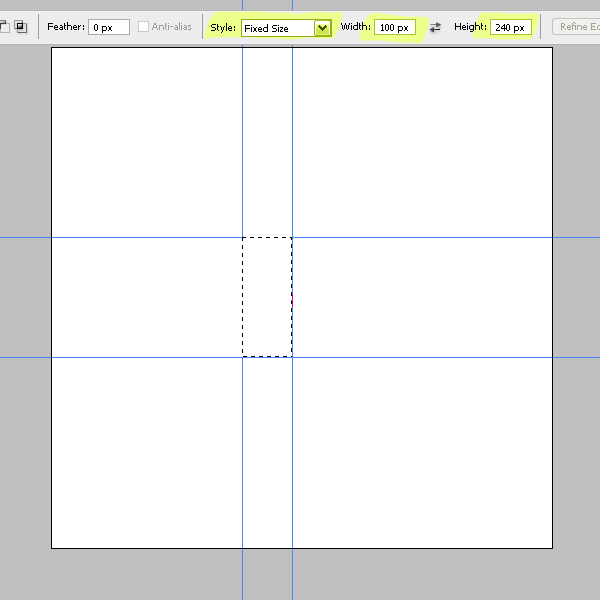
Let's start by creating a New Document which is 1000 pixels wide by 1000 pixels high, set the Resolution to 300 pixels/inch, and the Background to white. Grab the Rectangular Marquee Tool, then set the style to Fixed Size with a Width of 100 px and Height of 240 px. Drag four guides around the selection, as shown in the below image, then Deselect by hitting Command + D.
Step 2
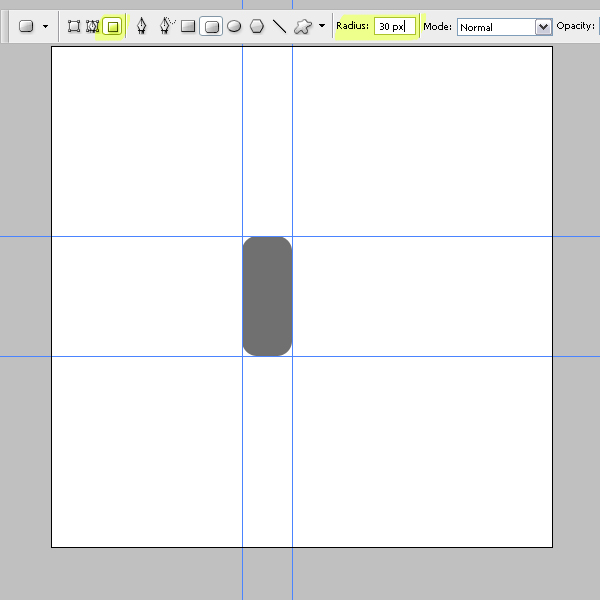
Create a new layer and name it "Front B." Set the foreground color to 55% gray. Get the Rounded Rectangle Tool, set it to Fill Pixels and Radius to 30 px in the Tool Options set. Draw a rounded rectangle as shown below.
Step 3
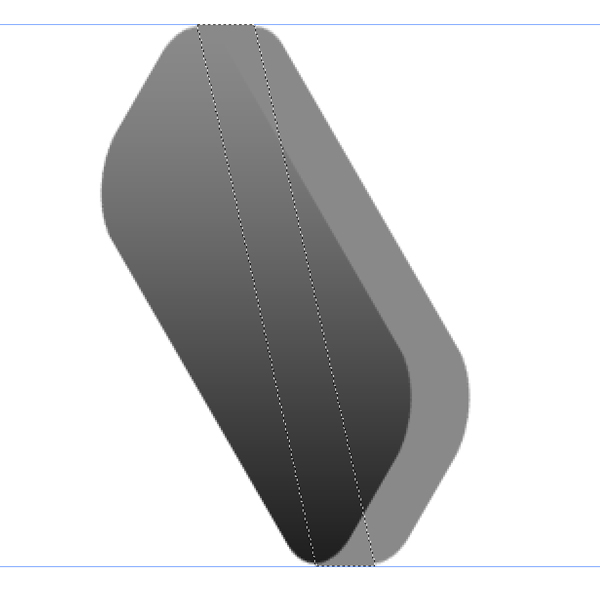
Now we'll clear the guides by going to View > Clear Guides. Hit Command + T to enter the Free Transform mode, set the Vertical Skew to -30 degrees, and apply it. Hit Command + T again and set the Rotation to -30 degrees. We could have skewed and rotated the layer at the same time. The reason why we did it in two steps is that it gives cleaner results. You can have a look at the below image for a comparison.
Now we need two horizontal guides. Drag and snap one to the top and one to the bottom of the transformed rectangle. This is not our final perspective angle, but it's easier to build up the USB key this way, then we'll rotate the whole thing again to achieve our final perspective look.
Step 4
Duplicate the "Front B" layer and name it "Front A." Move the "Front A" layer 30 pixels left. You can do it by using the Arrow keys on the keyboard when the Move Tool is selected. While holding Shift, press the Left Arrow key three times. Apply a Gradient Overlay layer Style with these settings: Blend Mode set to Multiply, Opacity at 100%, Gradient set at Black to white, Style of Linear, Angle set to 90 degrees, and Scale set to 130%.
Step 5
Now we need to connect these two rounded rectangles. Go back to the "Front B" layer in the Layers Palette. Get the Polygonal Lasso Tool and make a selection, as shown in the image below. Make sure the guides are visible. Fill the selection with 55% gray, then Deselect by hitting Command + D.
Step 6
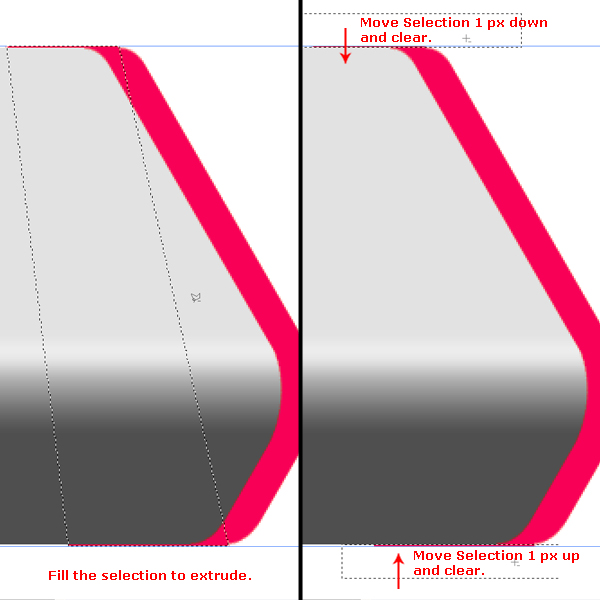
There are some unwanted pixels, lets get rid of them. Grab the Rectangular Marquee Tool, set the Style to Normal, and make a selection, as shown below. Move the selection 1 px down and hit Delete to clear the area. You can move the selections by using the Arrow Keys on the keyboard as long as a Marquee Tool is active. Now make a rectangular selection this time at the bottom. Move the selection 1 px up and hit Delete again.
Step 7
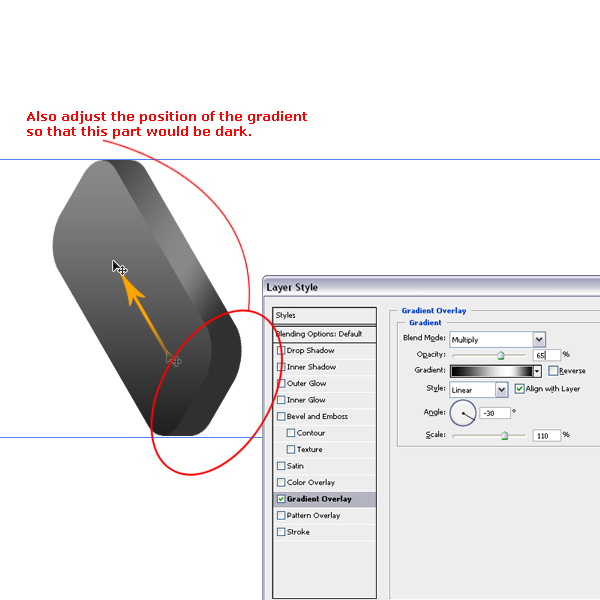
Now we'll apply a Gradient Overlay Layer Style to the "Front B" layer with these settings: Blend mode set to Multiply, Opacity at 65%, Gradient set at "Steel Bar" (which is in the Metals Set), with a Style of Linear, Angle set to -30 degrees, and Scale at 110%. Also, you can adjust the position of the gradient by dragging while the Gradient Overlay dialog is still open. Adjust the position like in the image as well.
Step 8
Command-click the "Front A" layer thumbnail to load the selection. I moved the selection 400 pixels right. This will define the length of your USB key, so you can change it if you want a longer or a shorter one. Create a new layer and name it "Back." I filled the selection with color #ee3232, but you can choose a different color according to your own taste.
Now create another new layer and name it "Body." Fill the selection with 15% gray. Deselect by hitting Command + D. Make the "Back" layer invisible, as we'll need it later. Drag and place the "Body" layer above the "Background" layer in the Layers Palette.
Step 9
Now we'll extrude the body as we did for the front part. Get the Polygonal Lasso Tool and make a selection as shown, then fill it with 15% gray. Hit Command + D to Deselect.
Step 10
Get the Rectangular Marque Tool and make a selection aligned to the upper guide, as in the image below. Move the selection 1 px down and clear by hitting Delete. Make another rectangular selection, this time at the bottom, move the selection 1 px up, and hit Delete again to clear the disturbing row of pixels.
Step 11
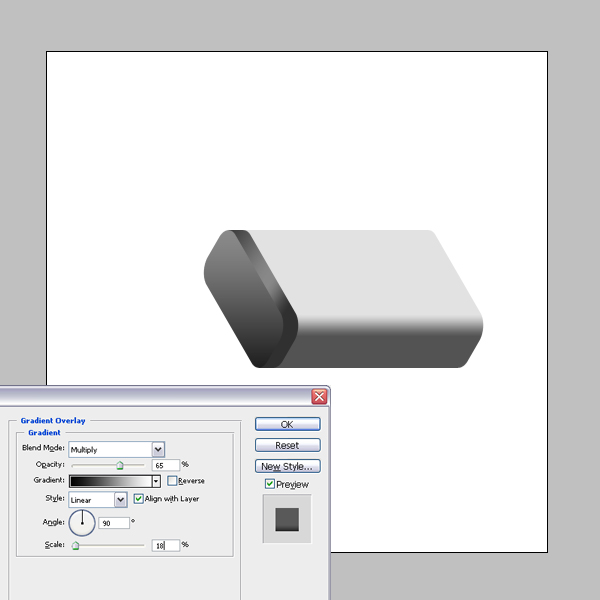
Now we'll apply a Gradient Overlay Layer Style to the "Body" layer to achieve the rounded corner. Use these settings: Blend mode set to Multiply, Opacity at 65%, Gradient set at Black to White, with a Style of Linear, Angle set to 90 degrees, and Scale set at 18%. Move the gradient down, as in the below image. You can do it by dragging while the Gradient Overlay dialog box is open.
Step 12
Go to the Layer Palette, then drag and place the "Back" layer just above the "Background" layer. Move the "Back" layer 20 px right using the Right Arrow key. Next, get the Polygonal Lasso Tool and make a selection, as shown below, then fill the selection with red (or your own color) to extrude the back part of the USB key. Hit Command + D to Deselect.
Get the Rectangular Marque Tool and make a selection aligned to the upper guide, as we did before. Move the selection 1 px down and clear by hitting Delete. Make another rectangular selection, this time at the bottom. Move the selection 1 px up and hit Delete again to clear the disturbing row of pixels.
Step 13
We need to apply a Gradient Overlay to the "Back" layer with the same settings as we used for the "Body." Now right-click on the "Body" layer in the Layers Palette and choose Copy Layer Style. Right-click the "Back" layer and choose Paste Layer Style.
Step 14
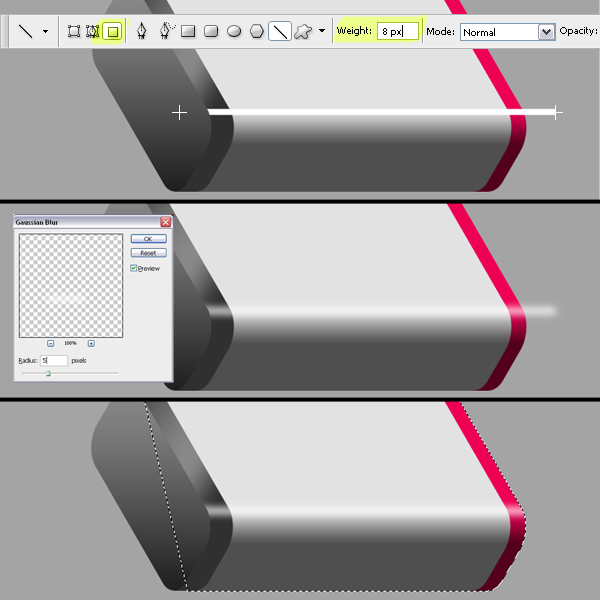
Create a new layer above the "Front B" layer and name it "Highlight." Grab the Line Tool, set it to Fill Pixels, and set Weight to 8 px. Choose white as your Foreground Color, and draw a straight line, as in the below image. Go to Filter > Blur > Gaussian Blur, apply with a Radius of 5 px.
Now we have the highlight, but we should delete the exceeding part. Command-click the "Body" Layer Thumbnail to load it's selection. We should also select the back part, so Command + Shift-click the "Back" Layer Thumbnail to add to the selection. Go to Select > Inverse and hit Delete to clear. Deselect by hitting Command + D.
Step 15
Create a new layer above the "Body" layer and name it "Reflection." Grab the Gradient Tool, set the Gradient to black to white, and fill the layer with the gradient from left to right. Go to Image > Adjustments > Curves and tweak the curve as shown below. This is my favorite way to make reflections. Then hit Command + T and rotate the "Reflection" layer 30 degrees. You'll see why we're doing this later.
Now because we want that reflection to be seen on the "Body" part, we need to get rid of the rest. Command-click the "Body" Layer Thumbnail to load the selection. Command + Alt-click the "Front B" Layer Thumbnail to subtract it from the current selection. Go to Select > Inverse and hit Delete to clear. Hit Command + D to Deselect. Set the Layer Blending Mode to Overlay.
Now get the Eraser Tool. Make sure the mode in the Tool Options is set to Brush. I set the Brush Master Diameter to 215 and Hardness to 25%. Erase the area below the rounded corner.
There are some painted pixels outside the canvas because we filled the whole page and then rotated the gradient. We can't see them at the moment. In the final steps we'll rotate the USB key and these pixels will be a problem so to get rid of them. Go to Select > All, then go to Image > Crop.
Step 16
We start drawing the plug. Command-click the "Front A " layer to load the selection. Create a new layer above the "Front A" and name it "Plug." Fill the selection with 25% gray. Deselect by hitting Command + D. Hit Command + T to enter Free Transform mode, set the Vertical and Horizontal Scales to 56%, and apply.
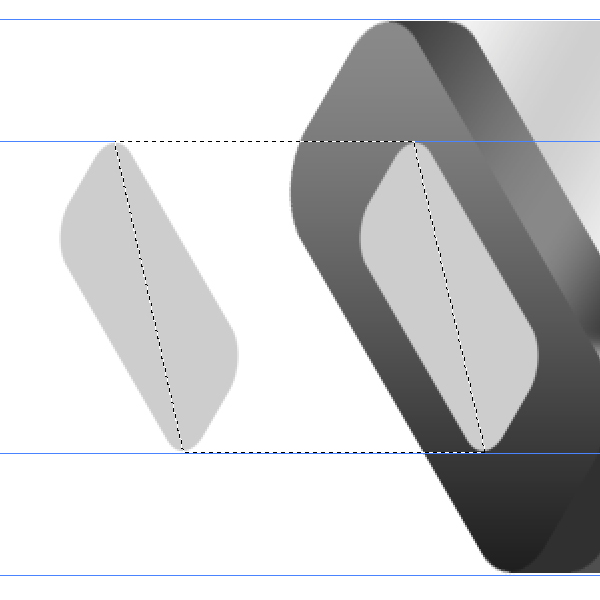
Step 17
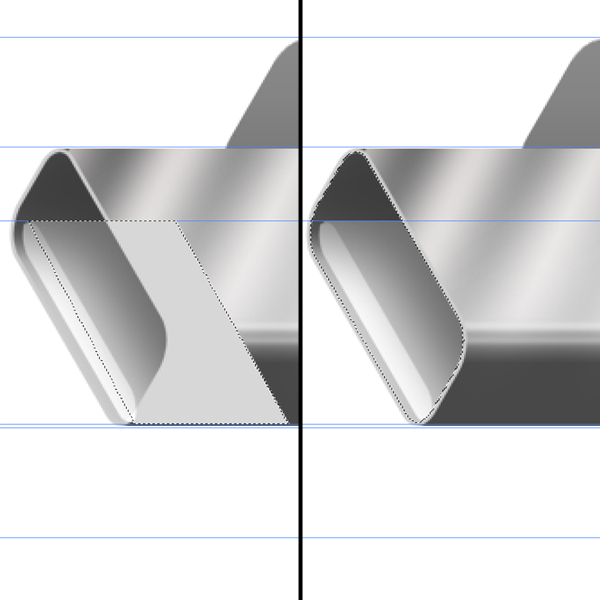
Duplicate the "Plug" layer and name it "Plug Front." Move the "Plug Front" layer 150 pixels left. Drag two guides from the upper Ruler and snap them to the top and bottom of the "Plug" layer. Go back to the "Plug" layer in the Layers Palette, get the Polygonal Lasso Tool, and make a selection as in the below image. Fill the selection with 25% gray, then deselect by hitting Command + D.
Step 18
Get the Rectangular Marque Tool and make a selection aligned to the upper guide, as shown below. Move the selection 1 px down and clear by hitting Delete. Make another rectangular selection, this time at the bottom, move the selection 1 px up, and hit Delete again to clear the disturbing row of pixels.
Step 19
Command-click the "Plug" layer Thumbnail, this will load the selection. Get the Gradient Tool, set the Gradient as Foreground to Transparent, set Foreground Color to black, and Gradient Style to Linear. Drag it, as shown below, to fill the selection with a black to transparent gradient. This will make the upper part of the plug darker, which is going to help us achieving the metallic look.
Hit Command + D to Deselect. Apply a Gradient Overlay Layer Style with these settings: Blent Mode set to Multiply, Opacity at 50%, Gradient set at Black to White, Style of Linear, Angle set to 90 degrees and Scale set to 18%. Move the Gradient down until it fits on the rounded corner, as in the below image, while the Gradient Overlay dialog is still open.
Step 20
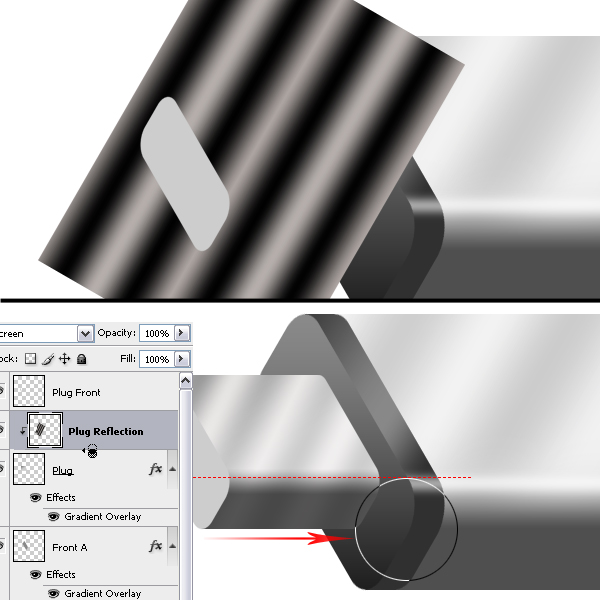
Create a new layer above the "Plug" layer and name it "Plug Reflection." Get the Rectangular Marque Tool and make a selection, as in the image below. Get the Gradient Tool. Set the Gradient to Silver (it's in the Metals Set.) Set the Gradient Style to Reflected and fill the selection starting from the middle to the left. Hit Command + D to Deselect. Go to Image > Adjustments > Invert to get the negative.
Step 21
Hit Command + T, then Scale the reflection a bit horizontally and rotate 30 degrees. Now we want to reflection visible only on the plug. So we'll define the "Plug" layer as a Clipping Mask for the "Plug Reflection." You can do it by Alt-clicking the line between these two layers in the Layers Palette. Get the Eraser Tool. Erase the area below the rounded corner of the plug. Also, set the layer Blending Mode to Screen.
Step 22
Create a new layer above the "Plug Reflection" layer and name it "Plug Highlight." Get the Line Tool, set it to Fill Pixels, and set Weight to 4 px. Also, set white as your Foreground Color. Draw a straight line, set Weight to 2 px and draw another line, as in the below image.
Go to Filter > Blur > Gaussian Blur, apply with a Radius of 1.5 px. Command-click the "Plug" layer to load the selection, then go to Select > Inverse and clear by hitting Delete. Set the "Plug Highlight" Layer Opacity at 60%.
Step 23
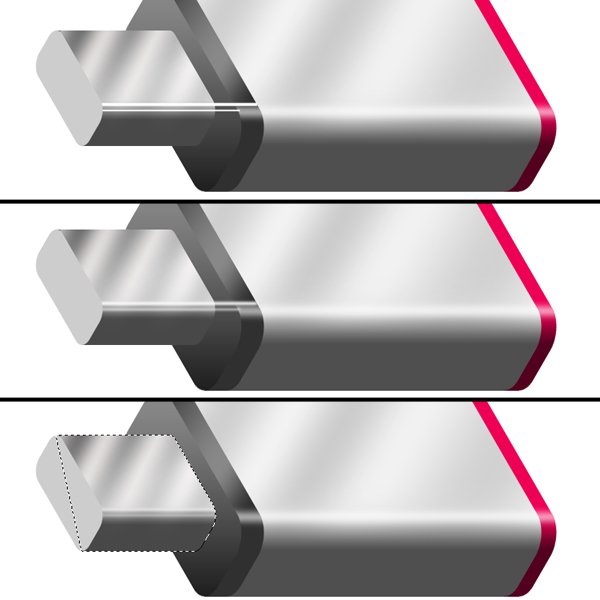
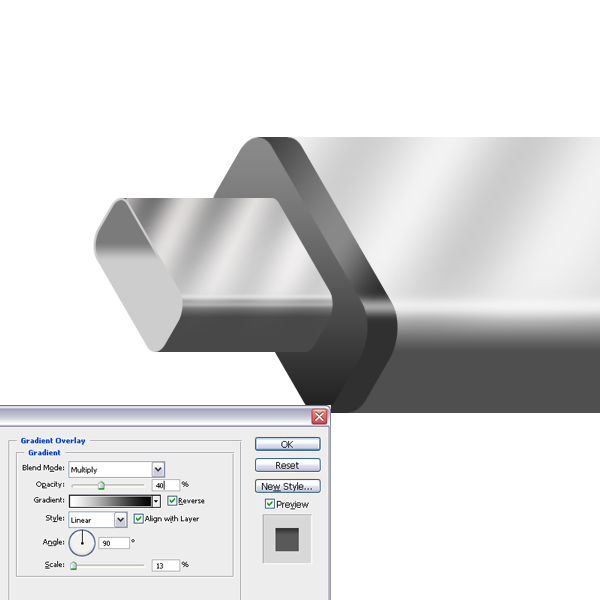
Now we'll make the hole on the plug. Command-click the "Plug Front" layer to load the selection. Go to Select > Modify > Contract and contract the selection by 2 pixels. Create a new layer above the "Plug Front" layer and name it "Plug Hole."
Fill the selection with 25% gray and apply a Gradient Overlay Layer Style with these settings: Blend Mode set to Multiply, Opacity at 40%, Gradient set at black to white, with a Style of Linear, Angle set to -90 degrees, and Scale at 13%. Move the gradient until it fits on the rounded corner of the plug.
Step 24
Create a new layer named "Plug Hole Shadow" just above the "Plug Hole" layer. Grab the Polygonal Lasso Tool, select an area as in the below image, and fill with black. Hit Command + D to Deselect. Go to Filter > Blur > Gaussian Blur. Set the Radius to 15 pixels. Command-click the "Plug Hole" layer, go to Select > Inverse to inverse the selection. Clear by hitting Delete. You should adjust the Opacity of the layer to your taste as well.
Step 25
Create a new layer above the "Plug Hole" layer and name it "White." Command-click the "Plug Hole" layer. Get the Rectangular Marque Tool and move the selection, as shown below. Command + Alt + Shift-click the "Plug Hole" Layer Thumbnail to intersect the selection, then fill the selection with white, and hit Command + D to Deselect. Move the "White" layer 5 pixels right. Drag horizontal guides and snap them to the top and the bottom of the "White" layer.
Step 26
Create another layer below the "White" layer and name it "White Top." Get the Polygonal Lasso Tool and make a selection, as shown below. Fill the selection with 20% gray. Command-click the "Plug Hole" layer, then go to Select > Inverse to inverse the loaded selection. Hit Delete to clear the part outside the hole. Go to "White" layer in the Layers Palette and hit Delete again. Hit Command + D to Deselect.
Step 27
Select the Layers in the Layer Palette, as shown below. Go to Layer > Group Layers (Command + G.) Name the group "Plug Bottom." Now duplicate the "Plug Bottom" group and name it "Plug Top." Go to Layer > Merge Group. Make the "Plug Bottom" group invisible for now.
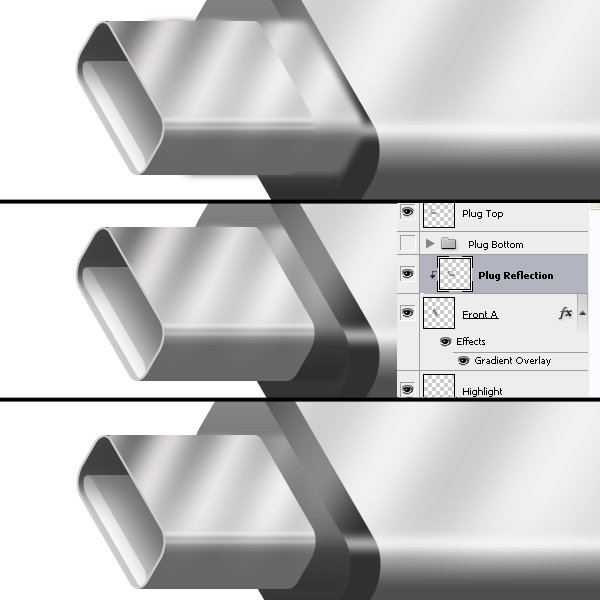
Step 28
Now we'll make the reflection of the plug on the body. Duplicate the "Plug Top" layer, name it "Plug Reflection," and drag it above the "Front A" layer in the Layers Palette. Move it right, as shown below. Go to Filter > Blur > Gaussian Blur and apply with a Radius of 3 pixels. In order to mask the reflection, Alt-click on the line between the "Plug Reflection" and the "Front A" layers in the Layers Palette. You can change the opacity of the layer as you wish.
Step 29
Let's continue tiding up our layers. Select all the layers except the "Background" and "Plug Top" layers and "Plug Bottom" Group. Go to Layer > Merge Layers (Command + E.) Rename the merged layer as "Body."
Step 30
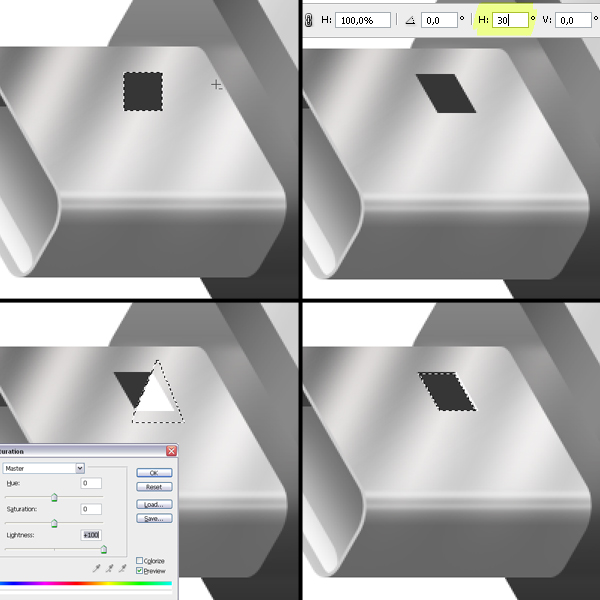
Now we'll make the two small holes on the plug. Create a new layer on the top of the layer stack named "Hole." Get the Rectangular Marque Tool, set Style to Fixed Size, and Width and Height both to 26 px. Make a selection as shown below. Fill the selection with 65% gray. Hit Command + D to deselect.
Hit Command + T and set the Horizontal Skew to 30 degrees. This will fit the perspective of the holes to the perspective of the plugs. Get the Polygonal Lasso Tool and make a selection, as shown in the bottom left image below. Go to Image > Adjustments > Hue/Saturation (Command + U), and set Lightness at +100% to make the selected part white.
Command-click the "Hole" layer to load the selection. Move the selection 1 px left and 1 px down. Command + Alt + Shift-click the "Hole" layer again to intersect the selection with the layer. Fill the selection with black. Also, deselect by hitting Command + D.
Step 31
Duplicate the "Hole" layer. Now we have two holes and they should be aligned properly. You can get help from the right or left edge of the plug. After aligning properly, select both hole layers and position them as shown below.
Step 32
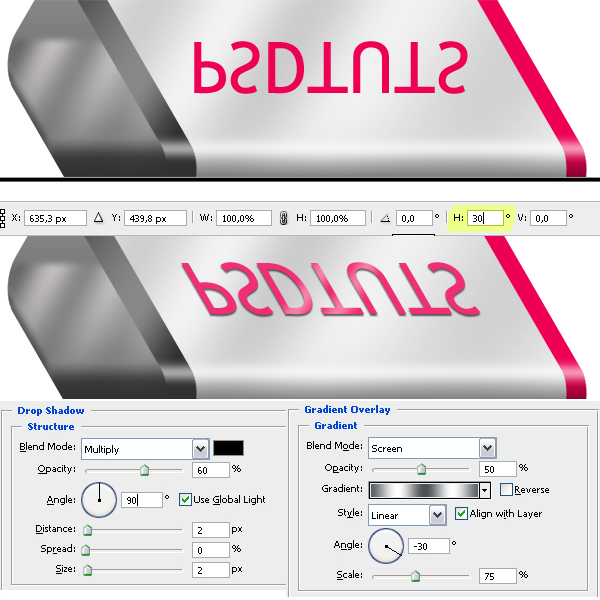
Now get the Text Tool. I set the font as Trebuchet MS with a size of 35 pt. Make your Foreground Color #ee0055, then type your text. Hit Command + T and set the Horizontal Skew to 30 degrees and apply. Rename your text layer as "Text." Apply a Gradient Overlay to "Text" layer using these settings: Blend Mode set to Screen, Opacity at 50%, Gradient set at Silver, with a Style of Linear, Angle set to 30 degrees, and Scale set at 75%.
We'll also apply a Drop shadow with the following settings: Blend Mode of Multiply, Opacity set at 60%, Angle set to 90 degrees, and Distance and Size set to 2 px.
Step 33
What we have now is our USB key. What we don't is the reflection. Our key will be floating in the air, and the bottom of it will be reflecting on the surface. And the bottom part of the key is slightly different from the top of it.
Duplicate the "Body" layer and name it "Body Bottom." Now select the "Hole Copy," "Hole," "Text," "Plug Top," and "Body" layers, then go to Layer > Merge. Name the merged layer "USB," and make "USB" layer invisible for now.
Step 34
We'll get the Text Tool again, make your Foreground Color #ee0055, and type your text. Hit Command + T and scale the text to fit on the plug. Go to Edit > Transform > Flip Vertical to mirror the text. Hit Command + T and set the Horizontal Skew to 30 degrees and apply. Rename your text layer as "Text."
Apply a Gradient Overlay to the "Text" layer using these settings: Blend Mode set to Screen, Opacity at 50%, Gradient set at Silver, with a Style of Linear, Angle set to 30 degrees ,and Scale set at 75%.
We'll also apply a Drop shadow with the following settings: Blend Mode of Multiply, Opacity set at 60%, Angle set to 90 degrees, and Distance and Size set to 2 px.
Make sure that one of the visible layers is selected in the Layers Palette, then go to Layer > Merge Visible. Name the merged layer "Reflection." Now you should have three layers: "Background," "USB Final," and "Reflection." Now we're almost done.
Step 35
Now make the "Plug Bottom" group visible. Open the group and delete the "White Top" layer. Go to the "White" layer and move it up, as shown below. Command-click the "Plug Hole" layer to load the selection, go to Select > Inverse. Hit Delete to Clear outside of the hole. Deselect by hitting Command + D. Go to the "Plug Hole Shadow" layer in the Layers Palette. Hit Command + T and rotate the layer 180 degrees, and make sure that it still fits in the hole.
Step 36
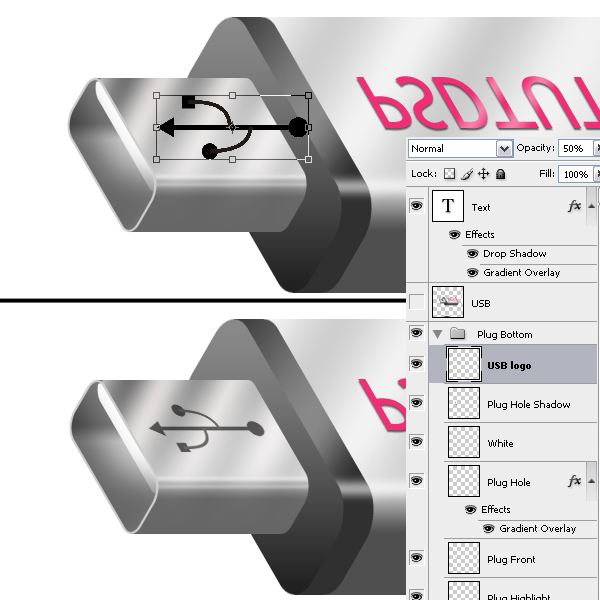
We'll now place the USB sign on the plug. I drew one and you can get it here. Open the "USBsign.png" file and get the Move Tool and drag the logo into your "USB Refleciton.psd."
Hit Command + T to enter Free Transform mode, rotate the logo -90 degrees, scale to fit on the plug, and apply. Go to Edit > Transform > Flip Vertical to mirror it. Hit Command + T again and set the Horizontal Skew to 30 degrees. Place it on the plug and set the Layer Opacity to 60%.
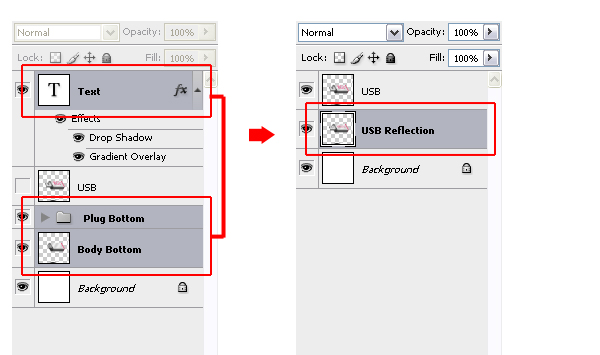
Step 37
Close the "Plug Bottom" group. Select the "Plug Bottom," "Body Bottom," and "Text" in the Layers Palette and go to Layer > Merge Layers. Name the merged layer "USB Reflection." Make sure that "USB" layer is on the top and all the layers are visible.
Step 38
Select both "USB" and "USB Reflection" layers in the Layers Palette, hit Command + T, and Rotate -30 degrees. Grab the Move Tool, then move the "USB Reflection" layer down, as shown below. Go to Filter > Blur > Gaussian Blur and apply with a Radius of 3 px. Also, set the Layer Opacity at 20%.
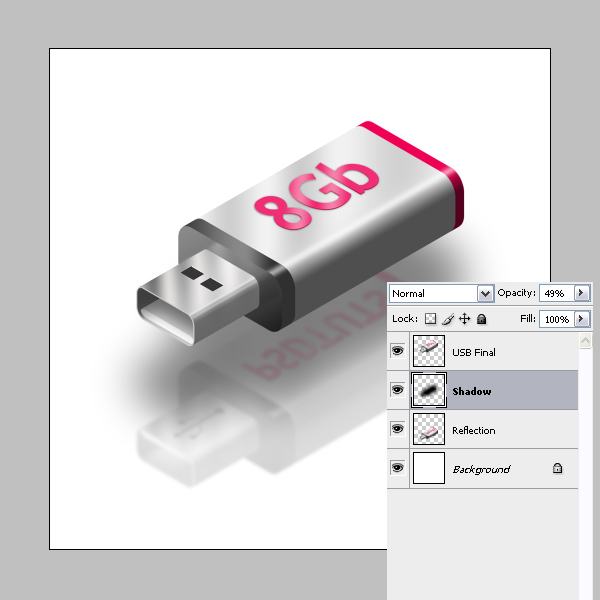
Step 39
Duplicate the "USB Reflection" layer and name it "Shadow." Hit Command + U to bring up the Hue/Saturation dialog. Set the Lightness to -100 to make the shadow black. Go to Filter > Blur > Gaussian Blur and apply with a Radius of 40 px. Set the Layer Opacity to 50% and move the "Shadow" layer up, as in the image below.
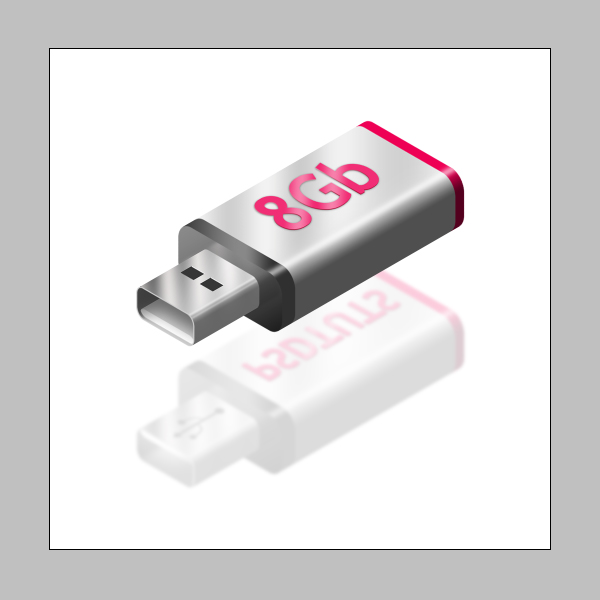
Conclusion
Finally, I scaled them down a bit and applied a gradient to the background. And this is the end of another tutorial. I hope you're happy with your own USB key illustration and had some fun! You can view the final image below or view a larger version here.


