
First step is to create blurred grass in the background. Set foreground color to dark green, background color to black. Then switch to gradient tool (G), make sure that current gradient is green-to-black, select Radial gradient (on top bar), then draw a big gradient from center to the edge of image.

I found a stock photo of grass and decided it will be good for background. Paste the image into your file...

... then resize it to fill entire image, desaturate (Ctrl-Shit-U) and apply Gaussian Blur (found in Filters menu - Blur) with large setting (50-100 pixels).

Set this layer opacity mode to Overlay.

Now let's create some black leaves in the background. It is very easy - set foreground color to black, then use Pen tool (P) to create some simple shape of a leaf.

Create some more leaves, then set their oapcity mode to soft Light and opacity to 30-40%. They are only for background and should be barely visible.

Now we need the main leaf, where the story will happen. Set foreground color to vivid green, then in the new layer, use Pen tool to make the shape of the leaf (I wanted it to twirl a bit).

Here is how the completed shape layer looks.

Apply a bit of layer effects:
- Inner glow (white, opacity = overlay 50%)
- Drop shadow (black, overlay 20-30%)
- Inner glow (white, opacity = overlay 50%)
- Drop shadow (black, overlay 20-30%)

Duplicate the layer, send it backward the layers palette (behind the original green layer), change its color to darker green (almost black), and move the shape itself a bit down - it will give leaf some depth.

Select green layer with leaf again, then make new layer above it, and Create Clipping Mask (from Layer menu, or Ctrl-Shift-G). Use large soft Brush tool (B) with white (and then black) colors to add highlights and shadows to the leaf.

Set this layer opacity to Overlay, 30-40%

Then create another new layer, fill it with grey, and apply a lot of Noise (Filters menu).

Create Clipping Mask for this layer too (Ctrl-Shift-G), so that this layer is also masked by leaf shape. Then, find Smudge tool (hit Shift-R until you see the finger icon), open Brush settings dropdown, select 4th brush from the end of default brushes set, set Strengh to about 50%.

with short mouse movements, smugde the noise in the direction of leaf growth.

Do not stop until all noise is smudged :-)

Finally, set this layer opacity to Overlay 40-50%

In new layer, set color to gray and with Pen tool, make a shape that overlays the bottom part of leaf.

Create Clipping Mask for this layer too (Ctrl-Shift-G or Layer menu), set opacity mode to Overlay, then open layer effects and add some Inner Glow effect (black, opacity mode = soft light, size = 40-60px)

Using the same technique, create more leaves!

Now we need some threads that spiders will hang on. In new layer, use small (1-2 px) hard white brush and draw several threads.

Set layer opacity mode to Overlay, then open layer effects and add Pattern overlay (blend mode = overlay, opacity around 50%, use any pattern that looks noisy).

Now it is time for a spider. It is very easy too: with Shape tool (U), make a green circle (hold Shift to make circle, not ellipse).

Apply the following layer effects:
- Drop shadow (blend mode = overlay, black, 1-2px)
- Inner Glow (white, overlay, 1-2px)
- Gradient overlay (white-to-black, blend mode = overlay, opacity 30-40%)
- Drop shadow (blend mode = overlay, black, 1-2px)
- Inner Glow (white, overlay, 1-2px)
- Gradient overlay (white-to-black, blend mode = overlay, opacity 30-40%)

That was a head. Create another bigger circle, apply the same layer effects: this is a body.

Add 2 small white circles, open layer effects and add Gradient overlay (white-to-black, blend mode = normal, opacity = 20-30%)

...and yes, 2 smaller black circles inside!

In another layer, use Line tool (U) and add some legs

Hmm, I thought that legs look better with some lighter circles in the endings.

Ta-da! Spider is ready.

Now that you know how to make a spider, why not add some more?

The most interesting part is a water drop. In new layer, with grey color, create a circle (use Ellipse tool, U, and hold Shift while making a shape). then switch to Direct Selection tool (A or Shift-A), and click on the bottom point of circle. use keyboard (Up arrow) to move it up a bit.

Change layer blend mode to Overlay, open Layer effects and add:
- drop shadow (black, multiply, 40-50%, 1px)
- bevel and emboss (both highlight and shadow are white, overlay, highlight opacity: 10%, shadow opacity: 60-70%, size = 0px)
- drop shadow (black, multiply, 40-50%, 1px)
- bevel and emboss (both highlight and shadow are white, overlay, highlight opacity: 10%, shadow opacity: 60-70%, size = 0px)

now, hide this layer (but keep it selected), then open Paths palette, right-click on the path and in the menu click Make selection...

Create new layer, send it backward the layers palette, then create merged copy of the selected area (Ctrl-Shift-C then Ctrl-V). Apply some Gaussian Blur to it (Filters menu - Blur), 2-3 pixels.

Create another new layer, send it backward the layers palette (behind the merged copy), then use soft black brush (B) and make a spot. Transform it (Ctrl-T) to stretch it horizontally.

It will be the shadow from water drop.

Make original water drop shape layer visible again, then create new layer above it, and draw a grey circle like shown here: bigger and aligned to bottom of water drop.

Here goes the interesting trick: set layer blend mode to Overlay, then open layer effects and add Gradient overlay. Set gradient blend mode to overlay too, opacity to about 70%, style = radial, reverse. But we will need to modify the gradient itself, and here is how...

click inside gradient - Gradient Editor will open. Choose black-to-white gradient (3rd in default set), then find the black slider on bottom-left of gradient, grad it a bit to the right, then click on empty space where black slider just was: new slider will appear. Change its color to grey.

Apply this gradient, then Create Clipping Mask with previous layer (Ctrl-Shift-G). Boom! :-)

Add another highlight: in new layer, with white soft brush (B), add a dot, then transform it (Ctrl-T) as shown here,...

then set its blend mode to... you guessed it, Overlay!, opacity to 30-40%, and again, Ctrl-Shift-G (Create clipping mask)

Add another highlight...

...set blend mode to overlay...

then let's make another nice reflection. Create new document (square, about 200x200 px), with transparent background, switch to Shape tool (U), choose Polygon, set sides=4, then open Options, check Star, and set Indent sizes to about 85%. With these options, add a star near top-left edge of image.

Rasterize the layer (Layer menu - Rasterize - Shape), then go to Filters - Distort - Spherize - apply about 50-60% effect. Repeat if needed.

Now copy-paste the star, transform it as needed (scale down and rotate), then set its blend mode to overlay.

Another nice highlight: return to the original shape layer with water drop, duplicate it (Ctrl-J), bring copied layer forward in layers palette (make sure that all clipped layers remain clipped). Then change its color to white and scale down a bit (Ctrl-T).

Using Path Selection tool (A), select the path, duplicate it (Ctl-C, Ctrl-V), move new path a bit to top-right, scale up (Ctrl-T) and click Substract button (2nd fo the 4 buttons on top bar)

Then, as always, set blend mode to Overlay, and opacity to 40-60%. The water drop is ready!

Make as many water drops and you like!

The very last touch is to make reflection of falling spider in the water drop. Make all layers invisible, except the layers belonging to falling spider. Select bottom half of it, copy merged (Ctrl-Shift-C).

Create new document (square), paste (Ctrl-V) and Flip Vertically (from Edit menu - Transform)

Go to Filters menu - Distort - Spherize, and apply the filter. Adjust % to your liking (60-70 may be enough).

Switch to Eraser (E), select large soft brush, and remove bottom part of image.

Now, select all (Ctrl-A), copy (Ctrl-C), close document, paste into our artwork document, and set blend mode to Overlay!

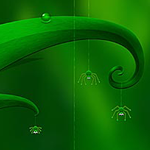
That's all!
You can view original wallpaper here:
Also, registered users can download Adobe Photoshop PSD file here: (for educational purposes only)
Thanks! I hope you found it useful.
You can view original wallpaper here:
Also, registered users can download Adobe Photoshop PSD file here: (for educational purposes only)
Thanks! I hope you found it useful.
0 comments:
Post a Comment